As discussed in Part 1, postural imbalances are endemic in the Parkinson’s Disease population. These postural imbalances inevitably lead to an impaired ability of the individual to balance and increases the likelihood of both single-incident and recurrent falling incidents. Addressing postural imbalances is a powerful tool that the professional can utilize to improve the quality of life of the PD client as well as improve lifestyle and functional capacity.
We discussed the cervical spine in Part 1 of this series. Moving down the spinal column will lead us logically to the thoracic spinal region.
Why Address Thoracic Kyphosis?
In Parkinson’s Disease (PD), the notorious “stooped posture” has become a defining aesthetic.[1] Poor posture is always a concern, but in the PD population, this same stooped posture can exacerbate the notorious muscle rigidity that tends to plague them.[2] Considering the effects of muscle rigidity on the potential for injury and falling incidents, addressing postural corrections trickles down to the most common trademarks of PD.
A stooped posture also lends itself to balance issues. In the general public, a stooped posture decreases balance and stability with these trends exhibited even more greatly by PD populations.[3] Considering the rampant falling incidents in PD, addressing posture is paramount to helping protect the client (in, one might say, empowering the client to protect him or herself) from fall potential.
Why Address the Thoracic and Cervical Spine Together?
When correction of the cervical spine is taken into consideration, the thoracic spine becomes even more vital since it is largely responsible for the placement of levator scapulae which, when rotated forward, help promote and reinforce cervical kyphosis. It becomes apparent very quickly that the cervical spine cannot be improved without also addressing the thoracic spine. Both should be approached together and rehabilitated simultaneously to improve the return on investment for the client.
Unfortunately, there are number of different etiologies surrounding thoracic kyphosis. When considered in tandem with cervical kyphosis, a confusing chicken-or-the-egg situation can present itself as both conditions exacerbate the other and can potentially cause the other, as well. This simply reinforces the importance of addressing the whole spine together for help to ensure the most success and smooth progression for the client.
How to Identify Thoracic Kyphosis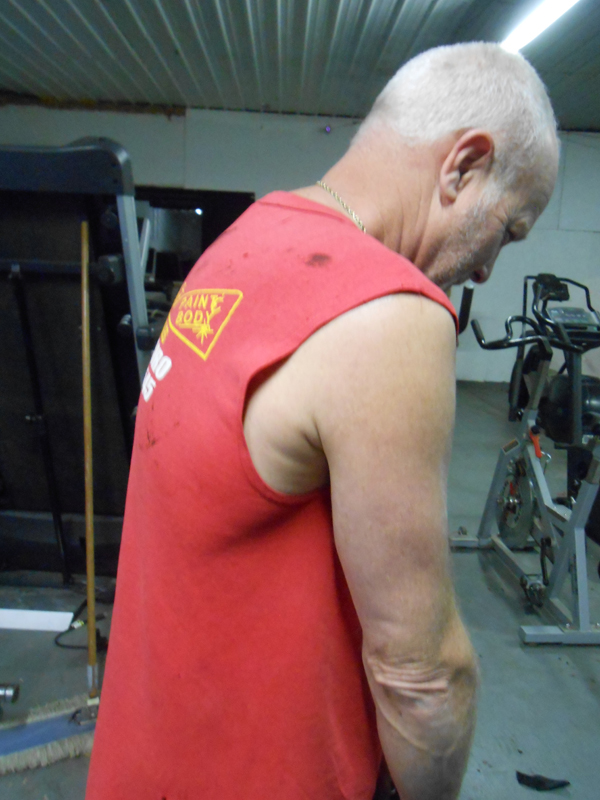
As mentioned previously, the surest way to identify any postural condition is through radiography. This is a tool that is not utilized by the physical trainer, however, unless a medical doctor has already been involved and ordered such tests. Instead, the professional must rely on anatomical clues.
The most obvious of these is the “stooped” posture that is so commonly associated with PD in general.
Visual clues to thoracic kyphosis:
- Forward head posture / Forward head carry
- Rounded shoulders (sunken chest)
- Fronts of hands visible from the front
- Exaggerated lordosis of the lumbar spine
- Scapular wide apart
Client clues to an existing kyphotic condition include:
- Complaints of shoulder pain
- Neck Pain
- Lower back pain
- Difficulty in scapular retraction, such as rowing or overhead pulling movements
These clients will often have difficulty learning how to retract their scapula and are candidates for disruptive sensory motor amnesia. It should be understood that it may take six months or longer for a client who has PD and thoracic kyphosis to be able to activate the scapular adductors, scapular retractors, and in some cases even the trapezius muscles effectively and on-demand. This should not discourage the professional or client from addressing these concerns, however, as postural correction is a powerful tool to improve the life of the PD client.
Corrective Stretches
Perhaps the most vital part to a program designed to counter thoracic kyphosis involves lengthening the tonic, shortened muscles that pull the body inward. These include the biceps, pectoral muscles, front deltoids, and sternocleidomastoids.
Much ado has been made about foam rollers, but I advocate a gentler approach to those with PD consisting instead of a simple foam noodle and a cushioned mat of some type. I also utilize a stationary bench for some movements.
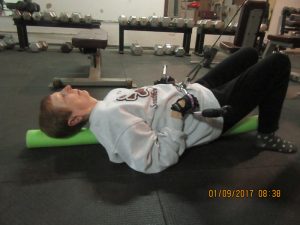
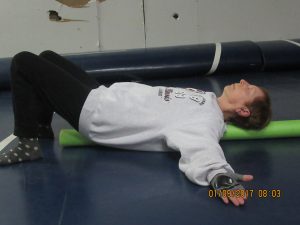 Stretch #1: Foam Noodle Palms-Up
This stretch is my go-to and is also very therapeutic for athletes who train extensively. Utilizing the gentle “give” of a foam noodle aligned so that it covers the entirety of the spine, combined with a stationary supine positioning of the hands is a self-correcting and gentle stretch. The feet should be kept flat on the floor with the lower back flat against the roller as well. Important cues for this stretch:
- Keep the palms turned upward
- Breathe as deeply into belly and pelvis as possible
- Keep the chin tucked but not cramped
- Keep the spine in contact with the foam noodle
- Relax over the foam noodle; imagine the back musculature like water flowing over the noodle
This stretch will also become very meditative and relaxing. Since it causes no pain or discomfort, it is also an easy sell to the client to do at home on his or her own time as well.
Stretch #2 Supine Bench Clock Face
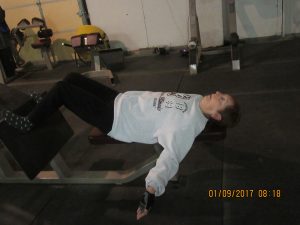 This stretch more strongly targets the chest, shoulders, and biceps. Using a fixed bench, the client lays supine with feet placed on either another bench or some other object like a Pilate ball. The client is then cued to imagine him or herself on a clock. With palms facing the ceiling, encourage the client to once again relax into the stretch. Be sure that the only sensation is stretching; if the client is especially frail, even the weight of the arm may be uncomfortable. In this case, supports for the arms can be provided.
The client should hold the arms at various points, imitating a clock face. Start lower, with the hands just outside the legs, and then move the hands up “one hour” every thirty (30) to sixty (60) seconds. This should be executed until, ideally, the arms are above the head. If this is not feasible, encourage the client to never force a stretch. It will come in due time with due diligence.
As alluded to earlier, a Pilate ball can be used to place the feet on for comfort and to help ensure the lower back stays flat. Alternatively, a Pilate ball can be used in lieu of a bench. I prefer a bench to start with, though, since extended periods of stretching and relaxing over a Pilate ball can potentially place excess stress on the lumbar or even hyperextend the thoracic spine. A Pilate ball should be considered only when the client has progressed considerably and is moving into a maintenance phase.
Important details to be aware of:
- Client’s palms facing the ceiling (supinated)
- Lower back is flat
- Feet steady and comfortable
- Chin in a tucked, but not cramped, position (back of head should lay comfortably with normal lordosis of the cervical spine)
- Deep breathing should be utilized in order to relax into a stretch
 Stretch #3: Chair-Assisted Stretch (Hallelujah Stretch)
This one is much simpler than its predecessors. With the lower back pushed into the chair or bench and feet flat on the floor, the client maintains proper cervical positioning while opening up the chest and extending the arms up and back, utilizing the chair back as a fulcrum. This position should be held for a minimum of sixty (60) seconds.
Important details:
- Client keeps the lumbar pressed into the bench
- Client keeps feet flat on the floor or placed on a stable platform provided by the equipment
- Client engages the abdominal structures to help reinforce core activation
- There is no pain in the shoulders during the stretch; a watchful trainer should be very cautious for signs of impingement
Strengthening Movements
As important as stretching the tight muscles may be, it is at least equally as important to target the weaker muscles for strengthening. Without addressing the weaker muscles involved in the imbalance matrix, it is impossible to effectively correct postural issues.
 Movement 1: Foam Noodle Scapular Pulls/Holds
This movement can be executed with a band with the client laying prone on a foam noodle, similar to the Foam Noodle Palms-Up stretch explained above. In this position the cable or band can be fixed above and the client can be encouraged to pull the scapular together, thus minutely moving the resistance implement.
It is possible that the client is completely unable to perform this movement. Due to a severe lack of coordination and sensory amnesia, he or she may not even know what it means to retract the scapula. In this instance, the client can instead resist the pull of the band to move the scapular up and away from the foam noodle and focus on keeping the scapula in the same position in the Foam Noodle Palms-Up stretch position. In this case it becomes a static instead of dynamic movement, but the foam noodle positioning tends to make the movement possible.
Once the client has become proficient and is consciously able to utilize the scapular musculature, this movement can be expanded to the standard bench and row set-up to start to actively strengthen the muscles once coordination has been firmly established.
Important details:
- Scapular retraction is vital. The use of a foam noodle to reinforce this is a valuable tool.
- The client should maintain a strong elbow and arm angle so that the shoulders and elbows are protected and the proper musculature is activated. No “winging” of the arms, for example.
- In exceedingly frail clients, a soft foam mat should be provided to avoid any discomfort, especially if he or she has weakness in neck musculature.
- When the arms are fully extended at the top of the movement, the client should also relax the scapula. The pull should always begin first by setting the scapula.
- As always, additional core engagement is a plus.
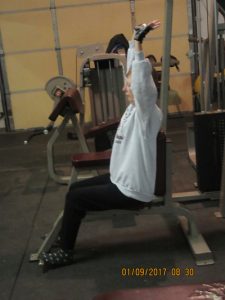
Movement 2: Hallelujah Raises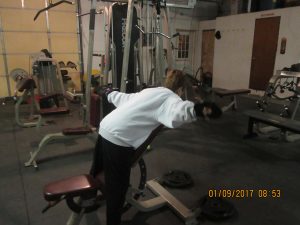
Utilizing an incline position, the client can lean comfortably forward onto the stable surface. With the palms down and the spine held in the appropriately neutral position, he or she should bring their hands back while retracting the scapular so that the arms form an approximate forty-five (45) degree angle from the head. Weights may or may not be necessary depending on the functionality of the client.
Important details:
- The position of the lumbar may vary, but as demonstrated above, keeping a more neutral position is preferable.
- Watch for hand position; the palms should face the same direction as the client’s face and eyes.
- Engage the core and, if possible, the glutes as well. This will help safeguard the lumbar spine and begin to correct it as well as reinforce strong postural positioning for future lumbar correction.
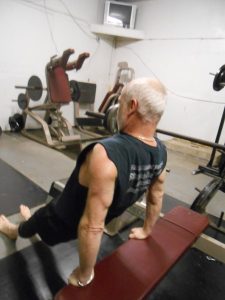 Movement 3: Bench Thoracic Presses
Sitting comfortably on a bench, the client pushes both palms into the bench and drives the shoulders and scapula down and back. This may or may not result in the client coming off of the bench. Careful attention should be paid so that the client does not simply round the shoulders and upper back to ground the illusion of the press.
- If the client cannot perform without the shoulders rounding, this activity should be avoided until a stronger base of strength is built.
- The position of the feet will determine how difficult the movement is. Let the client experiment with different foot positions until he or she finds one that is the most practical and comfortable.
- Expect some frustration with this movement as it can be difficult for a client to re-learn how to activate and mobilize the scapula.
The combination of these stretches and strengthening movements may help the Parkinson’s client deal with the otherwise inevitable consequences of poor posture. The road is often long and slow for correcting these kinds of issues, but the rewards form the proverbial pot o’ gold at the end of the (long and arduous, sometimes frustrating) rainbow.
In Part 3, we will begin to address the lumbar spine in more detail.
Shane Caraway uses his education, experience, and credentials as a certified personal trainer and nutritionist to help others recapture the primitive mystique, strength, and beauty that their body is capable of. His greatest pleasure comes from the successes of his clients, no matter how mundane or simple each small victory may be. Always in pursuit of various techniques, compounds, nutrients, herbs, and other means to help support the body against disease, Shane finds the challenge of combating chronic disease to be the pinnacle of his work, especially with diseases and conditions that otherwise cause clients to surrender.
References
[1] http://www.parkinsonnet.nl/media/1004438/doherty_lancet%20neurology%20(2011)%20postural%20deformities.pdf
[2] http://movementdisorders.ufhealth.org/2012/03/01/physical-therapy-tips-for-posture-improvement-in-parkinsons-disease/
[3] https://www.ncbi.nlm.nih.gov/pmc/articles/PMC1351284/