The Exercise Box Is Too Small!
How do you feel about exercise? Is it a necessary evil? A consuming passion? Something you have to do so that you can eat what you want? What box do you put exercise in?

How do you feel about exercise? Is it a necessary evil? A consuming passion? Something you have to do so that you can eat what you want? What box do you put exercise in?
Traditionally speaking, when it comes to exercise, men have dominated the lifting weights world. This occurred mainly due to men being allowed to participate in sporting activities while women were not allowed to because it was not considered “lady like” and it was illegal. However, times have changed, as women are no longer looked at as being inferior to men; and it is safe, appropriate and very normal for them to exercise, particularly lift weights.
Here are a few reasons why women say they do not need to lift weights and my answer to their concern.
It Will Make Me Look Bulky
While this is a very legit concern, it is typically not true. In order for a woman (or man) to look “bulky”, they will have to do what is called a lot of “volume” in their workouts. Volume is the number of weight, repetitions, sets and exercises done in order to achieve mass or bulk.
If a woman follows the recommended numbers of days of weight lifting/week by ACSM (2-3 days/week, lifting weights for all the major muscles using 1-2 sets of 8-12 reps), they will not get bulky.
Lifting Weights Does Not Help Me Burn Calories
Weight lifting has a high metabolic (ability to burn calories) rate. As a result, the more lean muscle a woman has, the less likely she is to gain weight and the easier it is to keep the weight off. Muscles are like the gas in our cars. The gas is used by the engine and keep the car moving. Having muscle, by lifting weights, allows your body to keep moving and consistently fight off fat gains.
There is No Benefit For Me to Lift Weights
There are tons of benefits of women lifting weights! They include weight loss, improved mood and well-being, better posture and prevention of osteoporosis. These four are all major concerns for most women and lifting weights helps with all of them!
I Only Need to do Cardio to Be Healthy
While doing cardio activities (i.e. running, swimming, elliptical, spin class, etc.) is beneficial for the heart, it does not put the necessary stress on the bone and muscular system that our bodies crave. We were designed in a way that our muscles were meant to be moved beyond just walking and typing on a computer! While cardio is a great way to burn calories, oftentimes, it will burn away muscle because it is a catabolic activity. Lifting weights help to balance that out.
Do I Really Need to Start Lifting Weights?
Yes, YOU do! I recommend that a woman looking to start lifting weights seek out professional help. A certified personal trainer is well qualified to provide safe and proper advice for her.
Also, I recommend home DVD workout programs such Power 90, Slim in 6 and Chalene Extreme that have all proven to help women strength train properly.
Weight training is important for everyone to do. It helps with posture, weight loss, prevention of osteoporosis and other metabolic diseases. It does not require a lot to do it, so why not incorporate two days/week for 30 minutes or less to lifting weights!
Maurice D. Williams is the owner of Move Well Fitness in Bethesda, MD, and Assistant Professor of Health & Human Performance at Freed-Hardeman University. He is a NASM Master Instructor and Master Trainer, and is also certified with NASM as a Corrective Exercise Specialist, Performance Enhancement Specialist, Senior Fitness Specialist & Weight Loss Specialist, and as a Certified Strength and Conditioning Specialist by NSCA.

People faced with the day in day out experience of ongoing muscle and joint pain often develop mental habits to help them cope that can actually make their condition worse.1 Emotions such as anger, depression and/or making comparisons to how things used to be before the physical problem began, distracts the brain temporarily to help override current sensations of pain. While these mental habits can provide fleeting relief, they also serve to prolong chronic pain conditions by changing brain chemistry and altering the mind and body’s response to pain.
We’ve all tweaked our backs every now and then. Maybe you’ve picked up a child and all of a sudden something felt strange. Or perhaps you had a bad night of sleep and your back shows the after-effects.

Most people associate the core with the look of your abdominals. They believe that having a strong core is associated with the look of a washboard stomach or Six Pack Abs. In reality, there are 27 muscles that make up the core of your body. From pelvis and hip muscles on up, the core is an entire system. Only a few of the muscles are visible to the naked eye.

According to studies, low back pain affects nearly 80% of all adults. Most low back injuries come from the following: wearing high heels (women), performing manual labor and people who sit for long periods of time (greater than 3 hrs.). Although these statistics are alarming, there are some simple steps one can take to make sure that they avoid current and future back pain or injury. These steps all involve simple exercises that can be performed from anywhere, including one’s office.

In order to prevent further injury or a relapse, the first thing to do is stretch common muscles that are tight and may have caused the lower back pain in the first place. Tight muscles are known to overwork and when this occurs, they become overactive and let us know through pain. These muscles include erector spinae, hip flexors, calves and the lats (the big back muscles).
For each stretch, you want to hold the stretch for 30-120 seconds and perform the movement for 1-2 repetitions 3-5x/week. (Watch Five Back Pain Stretches from WebMD.)
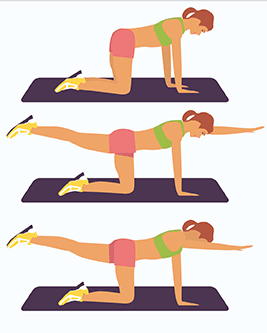
After you have stretched the tight muscles, now it is time to focus on strengthening the muscles that are weak or underactive. Typically, muscles become weak or underactive from lack of use or overuse by the muscles that assist or oppose the weak muscles. For example, if your hip flexor is tight, it could cause your glutes (butt) muscles to become weak. The muscles that tend to weaken with a lower back injury include certain core muscles, the butt and hamstrings.
For each strengthening exercise, you want to perform 1-2 sets of 10-15 repetitions 3-5x/week. (Watch Core Strength for Back Pain View and Good and Bad Exercises for Low Back Pain from WebMD).
Now that you have isolated the lower back with stretching and strengthening exercises, it’s time to focus on integrating your entire body back into exercising. Integrated exercises involve using as many muscles as possible in one given exercise. By performing integrated exercises, you will ensure that the your hip joint (which can be misaligned with low back injuries) starts and remains in the right position and the proper muscles are working as they should be.
For each integrated exercise, you want to perform 1-2 sets of 10-15 repetitions 3x/week.
If you follow these three simple steps, you can avoid low back pain setbacks and ensure that your back is strong enough to handle your daily activities of life.
Maurice D. Williams is a personal trainer and owner of Move Well Fitness, as well as a fitness educator for Move Well Fit Academy With almost two decades in the industry, he’s worked with a wide range of clients, including those with health challenges like diabetes, osteoporosis, multiple sclerosis, hypertension, coronary artery disease, lower back pain, pulmonary issues, and pregnancy. Maurice is also an Assistant Professor of Health & Human Performance at Freed-Hardeman University.

Make no mistake: sitting less time overall is a good idea for myriad health reasons, but is sitting as bad for you as some would suggest? Is it really the new smoking? In 2017 alone, a slew of new research studies has looked at various health detriments associated with prolonged sitting, even in adults who exercise regularly.
For adults with type 2 diabetes, bouts of either light walking or simple resistance activities benefit not only their glycemic responses to meals (4; 5), but also markers of cardiovascular risk. Both types of interrupting activities are associated with reductions in inflammatory lipids, increases in antioxidant capacity of other lipids, and changes in platelet activation (6).
What is good for one may not be as beneficial for all, though. For example, in adults with low levels of frailty, sedentary time is not predictive of mortality, regardless of physical activity level (1). Sitting more if you are already frail likely just increases frailty and mortality risk, which is not surprising. Along the same lines, being less fit matters in how you respond to breaking up sedentary time. Middle-aged adults with low levels of cardiorespiratory fitness gained the most metabolic benefit from breaking prolonged sitting with regular bouts of light walking, which included five minutes of light walking every 30 minutes over a 7-hour research period (2). If you’re already very fit, adding in some light walking breaks during the day is not going to have as much of an effect—again not surprising.
For in adolescents in school, reducing their sitting time (both in total time and length of bouts) has been shown to improve their blood lipid profiles and cognitive function. A “typical” day (65% of the time spent sitting with two sitting bouts >20 minutes) was compared with a simulated “reduced sitting” day (sitting 50% less with no bouts >20 minutes (3). Can teens stand to improve their health this week? Again, it cannot hurt to break up sedentary time, so why not do it? More recess breaks for teens would be good—and for everyone else for that matter.
All is not lost for people with limited mobility or no ability to engage in weight-bearing activities. Including short bouts of arm ergometry (five minutes of upper body work only every 30 minutes) during prolonged sitting attenuates postprandial glycemia (following two separate meals) when done by obese individuals at high risk of developing type 2 diabetes, even though they remain seated (7). People who cannot walk or stand can, therefore, break up their sedentary time in other ways that can also be metabolically beneficial.
As for other health benefits, breaking up sedentary time is associated with a lower risk of certain types of cancer. In a recent meta-analysis, prolonged television viewing, occupational sitting time, and total sitting time were all associated with increased risks of colorectal cancer in adults (8), which is the most common type after breast/prostate and lung cancers. That study reported a dose-response effect as well, suggesting that both prolonged total sitting time and greater total daily sitting time (2 hours) were associated with a significantly higher risk of colorectal cancer.

In summary, even just the most recent evidence is convincing enough that prolonged sitting is bad for you, and many more studies published similar results in prior years. Is sitting as bad as smoking, though? That remains to be proven. However, you really cannot argue with a recent international consensus statement on sedentary time in older people (9). It states, “Sedentary time is a modifiable determinant of poor health, and in older adults, reducing sedentary time may be an important first step in adopting and maintaining a more active lifestyle.” In fact, the best advice may simply be to consider the whole spectrum of physical activity, from sedentary behavior through to structured exercise (10). Putting yourself anywhere onto that spectrum is definitely better than sitting through the rest of your (shortened) life.
Reprinted with permission from Sheri Colberg.
Sheri R. Colberg, PhD, FACSM, is a Professor Emerita of Exercise Science at Old Dominion University and a former Adjunct Professor of Internal Medicine at Eastern Virginia Medical School. She is an internationally recognized authority on diabetes and exercise. As a leading expert on diabetes and exercise, Sheri has put her extensive knowledge to use in founding Diabetes Motion (diabetesmotion.com), a website providing practical guidance about being active with diabetes. She also founded Diabetes Motion Academy (dmacademy.com), offering training and continuing education to fitness professionals.
References cited:

 The need for trained maternal fitness professionals has greatly increased as a result of the number of fit women who desire to continue with their exercise routine once they become pregnant. The past several decades has provided a large body of evidence that supports the benefit and safety of prenatal exercise in uncomplicated pregnancies, and ACOG and other fitness and medical health organizations recognize the importance of fitness in a healthy pregnancy. Studies have shown that women who continue or even start an exercise program during pregnancy gain less fat weight, have fewer complications during labor and delivery, and return to their pre-pregnancy weight faster than women who didn’t exercise while pregnant.
Knowing what the current evidence based guidelines are for pregnant and postpartum women and being able to work with this population will open up opportunities to create a specialized program that fits their unique needs. Fitness professionals who have training in this field offer skilled support and guidance to pregnant and postpartum women and help them confidently include exercise as part of their lifestyle. Pregnant women are unsure of what exercises and activities they can continue throughout pregnancy and need guidance on how to monitor their routine for safety. As pregnancy progresses, women need strategies for modifying their exercise program as their body changes to maintain a comfortable and safe routine.
For more information on prenatal and postpartum exercise and our CE correspondence course, “Prenatal and Postpartum Exercise Design” please visit, www.ppfconsulting.com
Article reprinted from Catherine’s Maternal Fitness blog with permission.
Catherine Cram, MS, is the owner of Comprehensive Fitness Consulting, a company that provides pre- and postnatal fitness certifications and information to hospitals, health & wellness organizations and the military.

Knee pain is extremely common and can really make things very awkward and uncomfortable. Trust me I should know, only 8 weeks ago I tore my ACL (anterior cruciate ligament) in a freak accident that left me on crutches for 2 weeks and limping for the next 1-2 afterwards.